Archive for the ‘Email Hosting’ Category

Upgrade of Basic Hosting Server to NGINX

Tuesday, March 28th, 2017

NGINX is an open-source, high-performance HTTP server and reverse proxy, as well as an IMAP/POP3 proxy server. NGINX is known for its high performance, stability, rich feature set, simple configuration, and low resource consumption.

This past week, out network staff have upgraded the hosting platform for the 10MB free hosting service Register4Less.com provides with every domain name.  The server for the http://Register4Less.com website itself has also been upgraded to NGINX.  The hosting platform had been using Lighttpd for a number of years before the upgrade.

NGINX provides a number of advantages over Lighttpd or Apache, including:

  • possible per-domain customizations if required,
  • sub-domains can now be setup by ftping using the same credential as the domain it’s based on, using its own top-level folder,
  • no database use for configuration, so even more responsive than before,
  • using latest stable Nginx web server for better security.

While our staff are confident that the change from Lighttpd to NGINX will be seamless, we ask that if you are using our basic hosting platform and see any issues to contact our support team.

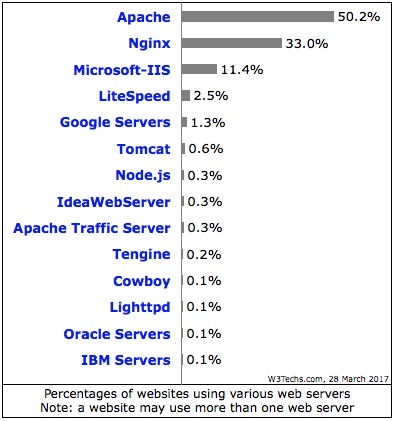
In the industry today, NGINX is second only to Apache in terms of volume of sites that use it as the web server application.

Use Your Gmail Account to Filter Spam

Thursday, July 7th, 2016

Less Spam with GreylistingI have had a gmail account setup for a number of years, but really haven’t been getting much use out it since I prefer to use my personal email based on my own domain name, which is of course registered and hosted with register4less.com.  The one thing gmail does actually do quite well is filter spam with a low rate of filtering out valid email.  There are a number of reasons I recommend to use an email address based on your own domain, including branding, portability, tie-in with your website, but that’s not the focus of this post.

Gmail allows you to forward incoming messages to your gmail address to any other external address, and this is what allows you to flow your email to gmail and back to your domain based email address for filtering.  Here are the steps:

Setup on Gmail:

  • If you don’t have a gmail account, go to their website and create a free account
  • Log into your gmail account, and go to Settings page, and then to the Forwarding and Pop tab.
  • In the Forwarding option, set gmail to forward all email to your domain based email address, and keep a copy in inbox on your gmail account.

Setup on R4L:

In this example, I will use the example email address johndoe@gmail.com and john@doe.com (both not real addresses, so please don’t email them).  My apologies if Mr. Doe receives additional email as a result of this post 🙂

  • Log into your account on Register4Less.com and go to the cPanel (Paid Hosting > Manage Advanced Hosting) where you normally manage your email accounts.
  • Click on Email Filters, and then your email address (john@doe.com in this example)
  • Click the blue Create Filter button
  • Give the filter a name (gmail filtering)
  • Under rules, choose Any Header and does not contain
  • In the box below, enter in the text X-Forwarded For: followed by your gmail address and then your domain based address.   In our example, that would be  X-Forwarded For: johndoe@gmail.com john@doe.com .
  • Under Actions, choose Redirect to Email, and in the text box below enter in your gmail address.  Again in our example, you would enter in johndoe@gmail.com .
  • Click the blue Save button

That is the entire setup.  Your email will now forward to gmail (spam included), be filtered, and then forwarded back.  The filter in your R4L account checks to see if the email was forwarded from your gmail account, and only if it finds that the email did not come from there will it forward to gmail.

You may know that Register4Less.com automatically backs up all of our hosting accounts on a daily basis for one week, and on a weekly basis for four weeks.  Setting up this forward will also create an additional backup for you, as all of the email that is forwarded to your gmail account will stay in the inbox there as well.

Please give this a try and let us know how it works for you.

How to Create a SPAM Filter

Tuesday, March 15th, 2016

Less Spam with GreylistingAhh, spam. Nobody likes spam. As a hosting provider, we really don’t like spam. But there are steps you can take to help protect your inbox from spammers. That’s why we have specific tools available to you in the cPanel interface to deal with spam. Some of these like BoxTrapper we’ve written about before.

SpamAssassin

Preloaded into the cPanel dashboard, SpamAssassin is an open-source tool built to filter and classify emails while blocking spam. Through a combination of subject line and body text analysis, Bayesian filtering, and DNS blacklists, SpamAssassin drastically limits and can  prevent spam from touching your inbox.

Creating a Spam Filter

In the Mail section of your cPanel account, choose Apache SpamAssassin. By default, Apache SpamAssassin is enabled.

Now you’re ready to set up email filters and specify how powerfully you’d like SpamAssassin to gate and vet incoming messages.

First, head to the “Email” section, navigate to “Global Filters,” and select “Create New Filter.”

Then, select “Spam Bar” from the first menu in the “Rules” section and then choose “Contains”from the second menu in that same section.

In that field, enter a spam score using a series of (+++++) symbols, with 5 being an adequate number for an individual user.  Lower numbers here mean a more aggressive spam filter.  Select “Deliver to folder” from the “Actions” section and enter the name of the folder (usually Junk or Spam) to which you would like to direct spam.  We don’t recommend deleting spam with this particular filter

Finally, click “Create” to activate the spam filter and, voila, your first filter is set up! (Be sure to check to occasionally check this folder to ensure items that are NOT spam aren’t being flagged.)

If you are getting spam that has specific patterns in the subject, from or to address or other part of the header, you can filter against these patterns as well.

Webmail Calendars & Contacts

Monday, March 7th, 2016

Calendars and Contacts Setup

With Register4Less's email service, you can maintain your contacts and calendar within your domain-based webmail interface, and access these using your smartphone. This can also be accessed from your desktop's contacts and calendar apps.

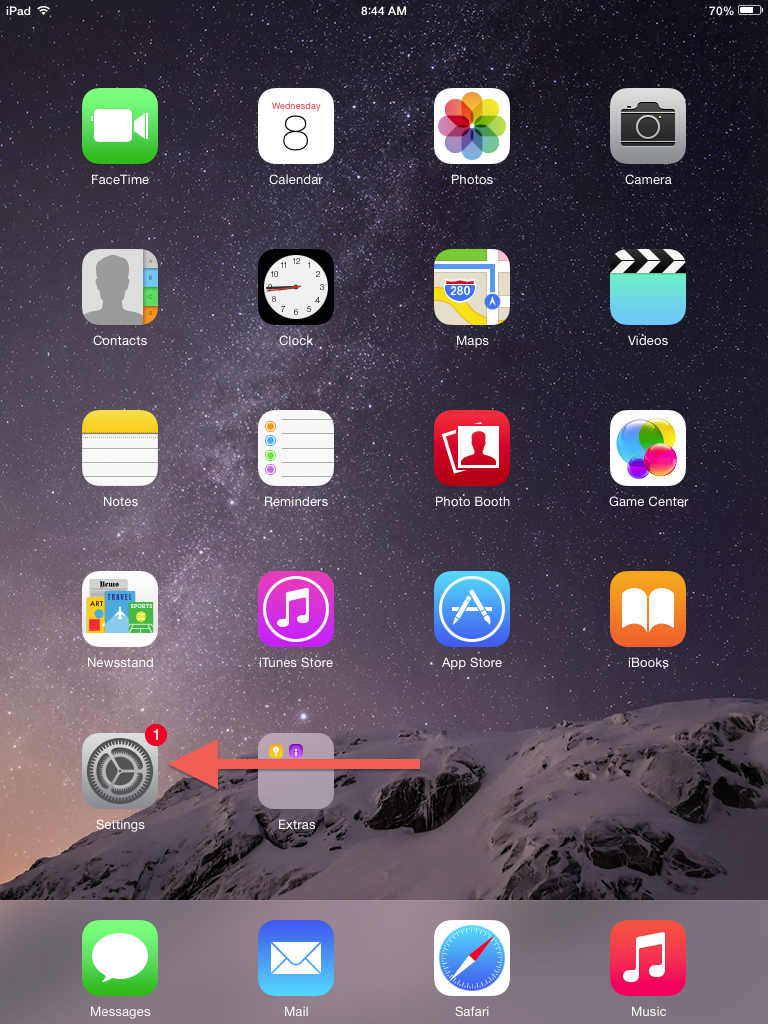
To set this up (example given here is iOS 8 on an iPhone), follow these steps:

Tap Settings

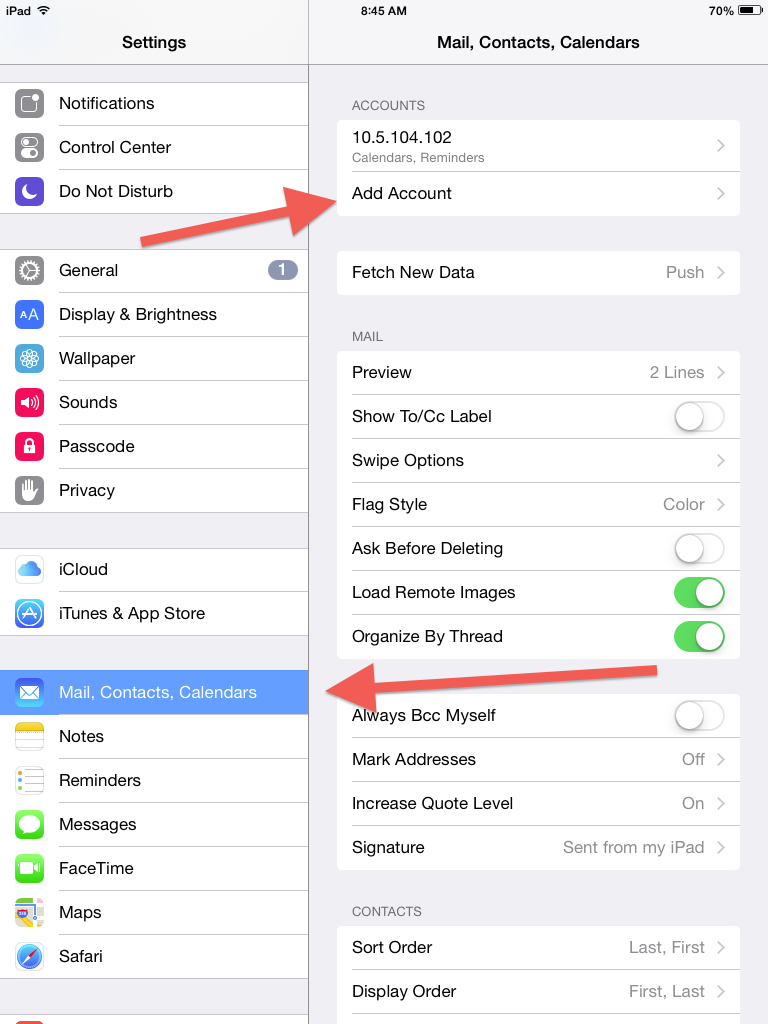
Tap on Mail, Contacts, Calendars, and then on Under Accounts, tap Add Account

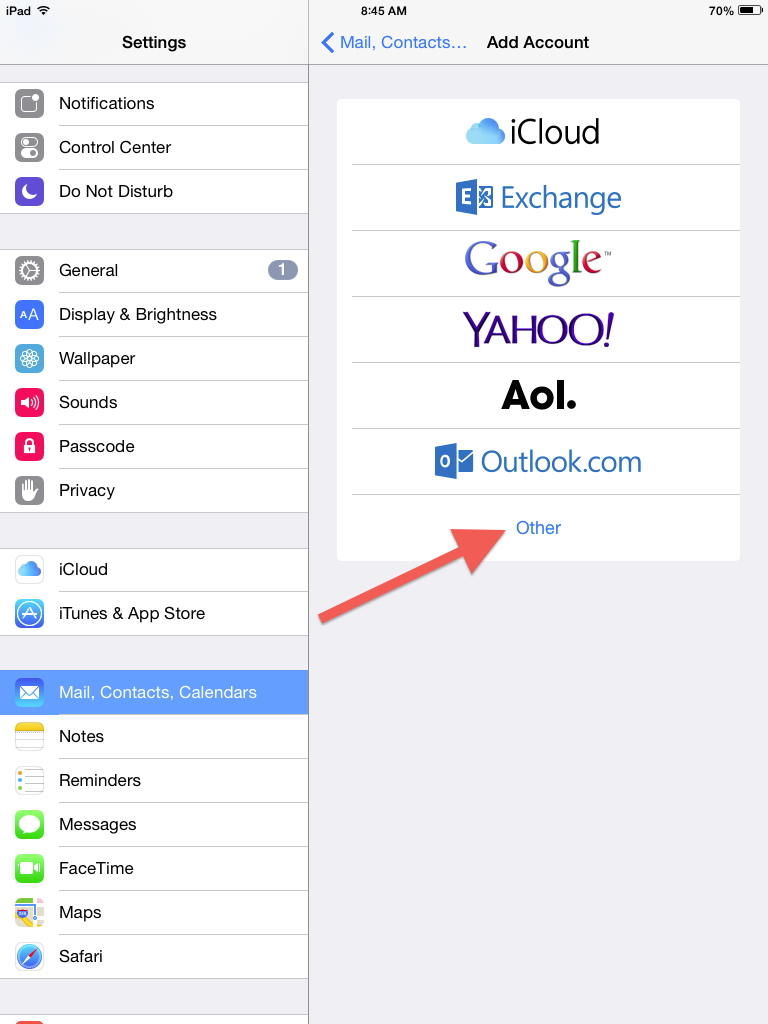
Choose Other for the account type.

How to Set Up Your Calendars

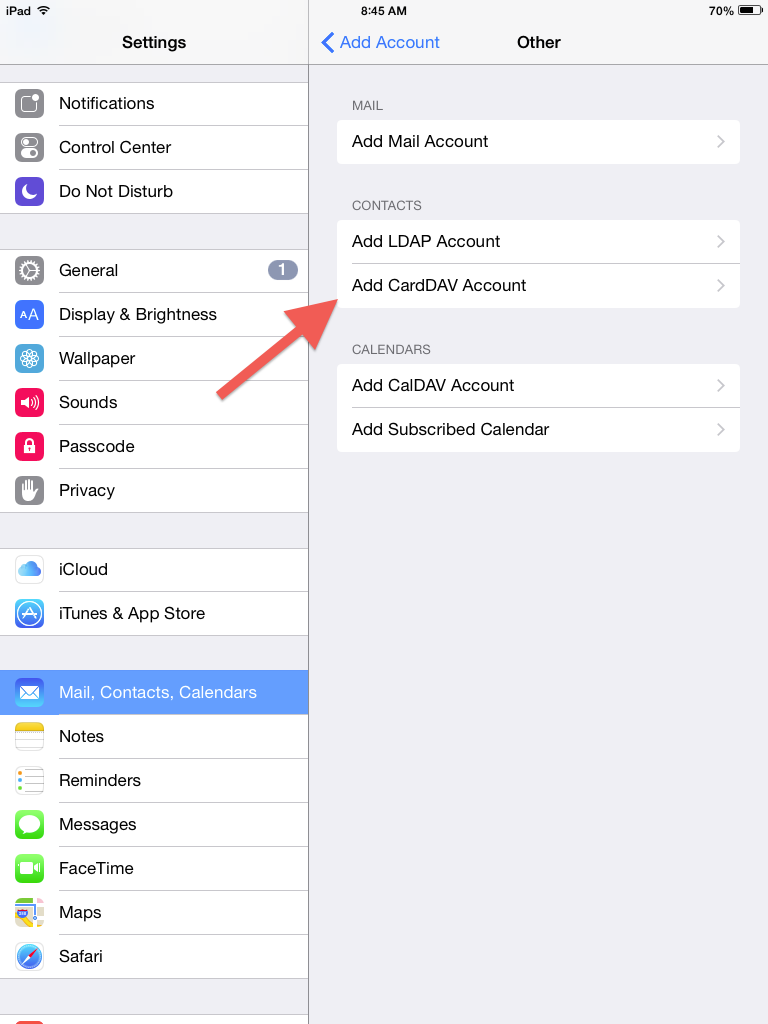
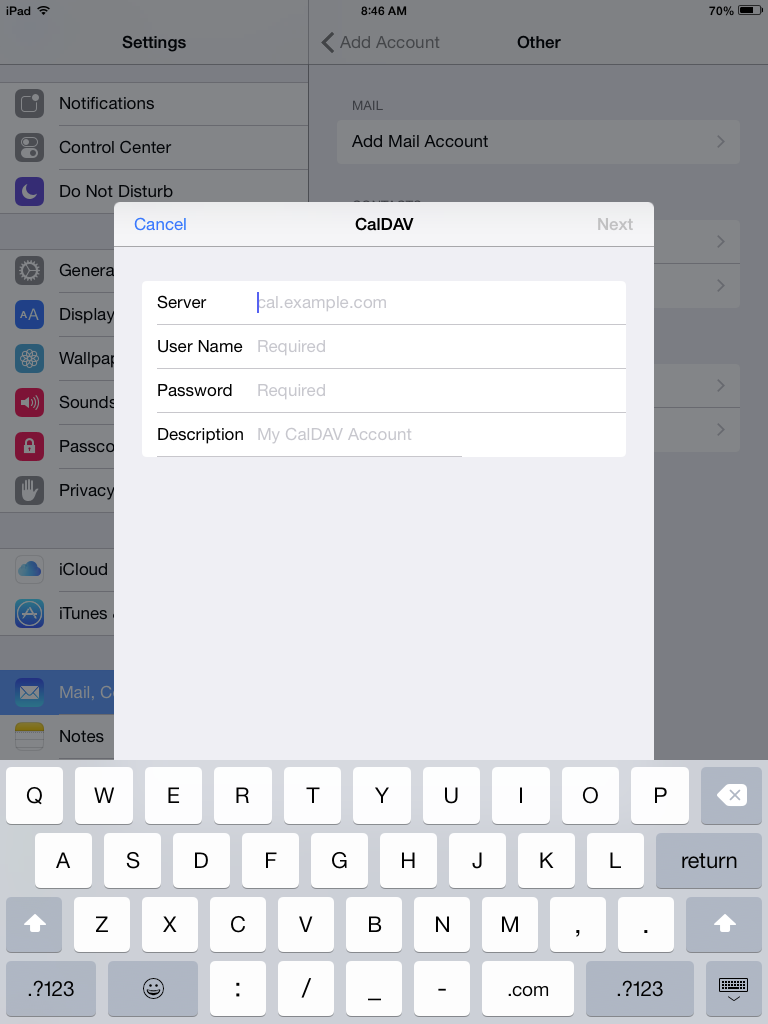
Tap Add CalDav Account

Enter your email address account information:

Server will be in the form of: ahsN.R4L.com:2080 where N is a number.  

To determine your server name, go on your web browser, and type in http://webmail. plus your domain. You will be forwarded to https://ahsN.r4l.com:2096. The N of course will be the actual number of the server, so something like ahs4.R4L.com.

Username is your complete email address.

Password is of course the password you have created the account with. If you're not sure what this is, you can reset the password, but you will then need to change this on any device you use to connect to your email.

Description is optional.  It is simply a text description to differentiate different accounts if you are connecting more than one.

A Note About Port Numbers

In the URLs above, :2080 and :2096 are the port numbers on the server being connected to. 2080 is the port reserved to connect to CalDav, and 2096 is the port for encrypted webmail login.


How to Set Up Your Contacts

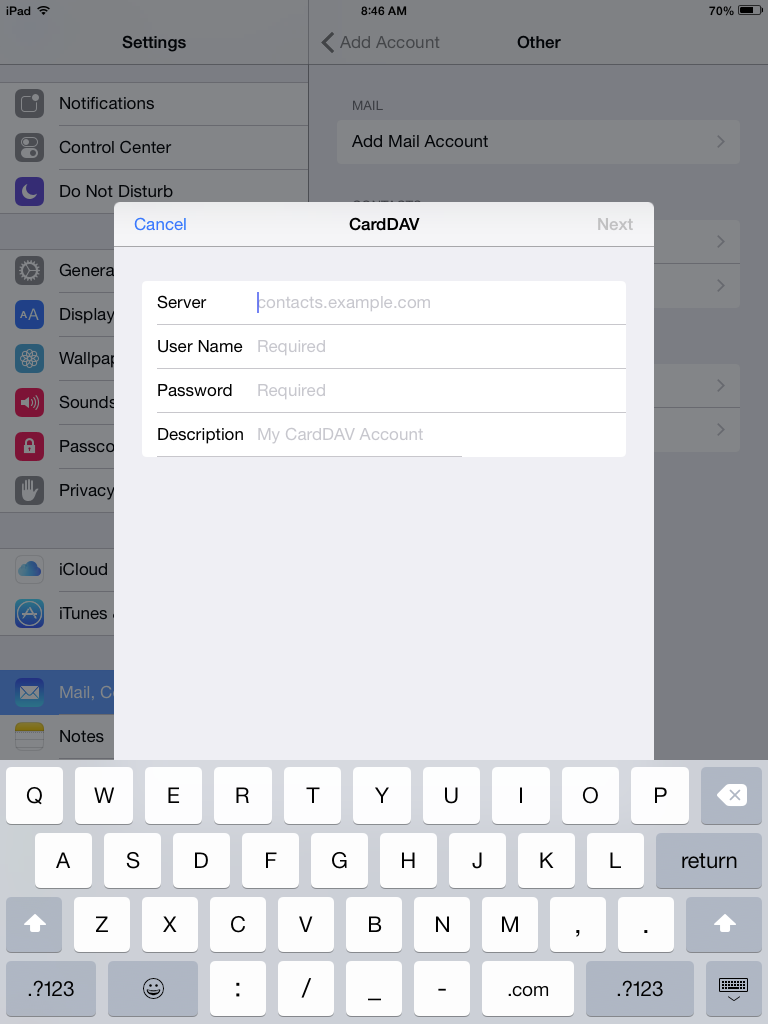
Tap Add CardDav Account

Enter your email address account information:


All of the settings for server, username and password will be the same as for configuring your contacts.

Reseller Hosting

Monday, January 18th, 2016

advanced-hostingRetail Advanced Hosting Plans

Register4Less.com offers two types of advanced hosting services.  Our regular hosting plans provide web only, email only, and combined web and email hosting on a per domain basis.  These are priced between $1.45/month for our entry level 50MB Agate web hosting plan to $11.95/month for our 25GB web, 100 email (200GB space for mail) Topaz Hosting plan.  All of these plans feature the cPanel (control panel) interface to manage email and web hosting features.  The Trendy Tools web builder is included with all web hosting plans, as is the ability to install WordPress, Joomla, Drupal, PHPbb, PHPList and other applications.

Reseller Advanced Hosting Plans

Our reseller plan allows you to create your own hosting plans, so you can define what disc space is allocation for web and email hosting.  The reseller plans start at $24.95 for our Opal 50GB plan and go up to $79.95 for our Onyx 200GB plan.

With the reseller plan, you can sell web hosting plans directly to your customers, or if you have a lot of domains you want to set up, this allows you to host as many as you wish, provided of course that they fit within the space the plan you have selected allows.

Steps for setting up Reseller Hosting

When you purchase a retail hosting plan, the features this plan has are predefined.  With reseller hosting, you have the freedom of defining different packages you can sell to your customers or assign to your own domains, but you do first have to create these.

WHM vs cPanel

In addition to the cPanel interface to manage the hosting services for your domain, you will have an additional WHM (Web Host Manager) interface to use to manage the other domain you will be setting up to use your hosting service.  To connect to this, log into the domain under which you purchased the reseller hosting package (we’ll call this your reseller domain), and go to Paid Hosting > Web Hosting Manager (WHM).

Defining Packages

The first thing you will want to do once you’ve purchased a reseller hosting plan is to setup your packages.  With WHM open, on the left column click on Packages and then the icon for Add a Package.  You can at any time create, edit or delete a package.  A good example set of features for a hosting package are:

  • Disk Quota (MB) – 1,000
  • Monthly Bandwidth (MB) – unlimited
  • Max FTP Accounts – 10
  • Max Email Accounts – 10
  • Max Email Lists – 10
  • Max Databases – 10
  • Max Sub Domains – unlimited
  • Max Parked Domains – unlimited
  • Max Add-on Domains – 0
  • Maximum Hourly Email by Domain Relayed – unlimited
  • Maximum percentage of failed or deferred messages a domain may send per hour – unlimited

Under Settings, you’ll want CGI Access selected, and the other options not.  Paper lantern is the recommended theme, and choose default for the Feature List.

Once you have completed your settings, make sure you click the blue Save Settings button.

Setting up DNS

When you are adding a domain to your hosting plan, you will need to make sure the DNS is set correctly.  This will have been done automatically for your reseller domain, so what we want to do is configure the domain your adding to have the same DNS setup as your reseller domain.

To do this, instead of typing in all of the settings in the custom DNS zone editor, you will use the DNS > Point Domain(s) to Zone function.  Once on this page, locate the domain you are adding and check the selection box next to it, and the find the Custom Zone box that has your reseller domain in it.  Click the Point to this Zone button in this custom zone box.  You can point more than one domain at a time.

Creating a New Account

Now that you have your packages created and DNS set, you’re ready to add the domain to WHM.  To do this, click on Account Functions, and then Create a New Account.

You will enter in the name of the domain, the username and password (twice), and an email address for the owner of the domain.  You will choose a package from a drop-down list, and should check the option Use the nameservers specified at the Domain’s Registrar.  Leave the Local Mail Exchanger option selected and click the blue Create buttons.

For your customer, they can then login to their cPAnel by entering in the name of their domain and append /cpanel or :2083

 

Webmail – Three Available Interfaces

Monday, January 4th, 2016

WEBMAILAPSIn addition to connecting to your email account via a mail client on your computer, tablet or smartphone, you have the choice of three webmail programs from the cPanel.  You can connect to the login screen for your webmail in two different ways:

  • Go to http://webmail. plus your domain, or
  • Login to manage your domain, open the cPanel, and click the Email accounts icon.  Where each email account is listed you’ll see More on the right side.  Click this and then Access Webmail.

Webmail is one of the most commonly used functions of the cPanel interface.

horde

The Horde Project is an open-source development community that is responsible for the creation of many applications.  Based on PHP, Horde developers have created not only a robust webmail interface, but also complementary widgets that range from calendars, notes, message filtering and message flagging, and powerful search tools.

roundcube

RoundCube is the world’s most popular open source Webmail interface, and is the one the R4L staff recommends setting as your default.  While not as feature rich as Horde, RoundCube features a modern drag-and-drop interface.  RoundCube also features search tools, flagging tools to easily organize your Inbox, Sent, and other folders.

squirrelmail

SquirrelMail is the most streamlined of the three available webmail applications.  SquirrelMail does provide an address book feature, mail composition can only be done in plain text, sending email with HTML formatting is not possible with SquirrelMail.

Get Less Spam with Greylisting

Monday, August 17th, 2015

Less Spam with GreylistingUpdate: We have disabled Greylisting accross the board since it was confusing too many users. We will re-enable whenever cPanel offers to enable this and default to “disabled”.

If you use our advanced email service for your domains and have a package that includes email hosting, your account will have been upgraded to add greylisting service.

Greylisting is a great weapon in the ongoing war against spammers. Greylisting is quite simple in it’s implementation and takes advantage of how most spammers set up their servers to send out spam.

Most people recognize spam pretty easily, and usually will simply delete any spam they receive.  Spam email will also occasionally get reported to the hosting provider, in the hope that they will shut down the spammer.  Unfortunately, there are providers in certain areas that allow this kind of abuse to go in.  You should note greylisting is available for our advanced hosting plans, and is not for the free email aliases.register4less (more…)

Attention gmail Users

Tuesday, December 30th, 2014

If you have email aliases setup with R4L (why not, they’re free) and forward your aliases to a gmail account, you can use our new SMTP service in order to configure GMail to use this alias.

(more…)

Website Building Options

Thursday, November 6th, 2014

You have registered your domain name now, want to build a website, but are not sure of how to proceed. With Register4Less.com, you have several options, and we’ll lay these out below.

R4L Free Hosting Platform

On most accounts with us, we provide you with 10 MB of space for hosting a site free with your domain registration. The free hosting platform is perfect if you’re building a small personal or business site, and have some experience with HTML and CSS, and potentially Javascript.  The free hosting platform does not support databases like MySQL or server side scripting languages like PHP, Python, or Perl, but does support Javascript.
The best way to connect with the server to publish your site, whether directly from the program you are using or from an FTP program like FileZilla is to use the FTP service.  Please see this page on R4L’s help Wiki for instructions.

(more…)

Using BoxTrapper to Fight Spam

Wednesday, May 7th, 2014

Less Spam with GreylistingIf you’re an R4L customer using one of our combined web and email hosting packages, BoxTrapper is an aggressive spam filtering service that can help defeat spammers.

How it Works

When we receive new email for your account from an address you have not whitelisted, BoxTrapper will hold the email in a pending list.  For the email to make it to your inbox, one of two things needs to happen:

  1. The sender confirms they are a human sending email and not a spam bot.  This is done via an email that is sent back to the sender with a link to a page on your website to confirm.
  2. You review your list of “trapped” mail, select the email and click the option to Whitelist and Deliver.

(more…)

Using Mail Filters to Fight SPAM

Tuesday, December 24th, 2013

Less Spam with GreylistingSpam, unsolicited commercial email, is something that pretty much anyone with an email account has become familiar with. Most Internet Service Providers have strict acceptable usage policies (AUPs, the link goes to ours), and will monitor and disable accounts if they see them sending spam, however not all do.

(more…)

New Hosting Platform Now Live!

Friday, May 24th, 2013

For those of you who watch the R4L Blog, great news. The new advanced hosting services are now live! This is literally the biggest undertaking we have taken in terms of adding new services for our customers, and one that our entire team is very excited about.

Hosting on R4L Dedicated Servers

First, a little history on how this development came about. (more…)