Moving a WordPress Site to the Root Directory
Thursday, June 1st, 2017![]() There are a couple of common reasons people will want to move their WordPress website from a directory to the root directory. The most common we’ve seen are:
There are a couple of common reasons people will want to move their WordPress website from a directory to the root directory. The most common we’ve seen are:
- They installed WordPress in Softaculous’ default /wp directory, and don’t want to have to setup a forwarder for their website.
- They developed their site in a directory so that their website would not be offline or interfered with and now want to replace their existing site with the WordPress site.
While you can use the Duplicator plugin to create a zip archive of your website and then restore it in the root, there really is no need to create a large file to download and then re-upload. The advantage of this is the plugin will rename all of the URLs that will need to be updated. Disadvantage however is it is much slower, and potentially creates a very large file you will need to download and then re-upload.
Here’s how to do the move without the plugin:
1 – Backup Your Site
Before doing the move, to be safe, we recommend you use the backup wizard to create a backup of your home directory and MySQL database. The backup Wizard will download the two backup files to your local hard drive.
- Log in for your domain and open your cPanel
- Click on Backup Wizard in the Files section
- Click Backup, and then Home Directory and MySql Database
2 – Remove Old Files from the Root Directory
You can do this in a number of ways, deleting the files or moving them to a directory called something like “old_site”.
- It is important that you delete or move the file called index.htm or index.html. WordPress uses a file named index.php as its starting index file. Most web servers, including ours, will load the html file before the php file.
- Make certain there are no files in the root directory that would have the same name as any files that are in the directory where your WordPress website is currently.
- If your WordPress site is currently using a caching plugin, deactivate the plugin and remove any cached files.
3 – Update WordPress’ Target Address
Log into your WordPress dashboard, and go to Settings > General, and update the target WordPress Address and Site Address so that the directory is removed.
When you click the Save button, you will immediately see a 404 Not Found error page. Do not ba alarmed, that is normal. You will be able to log in once you move your files in the next step.
4 – Move the Files
Using either FTP or the File Manager, you’re going to move the files from the directory WordPress is in to the root directory for your website.
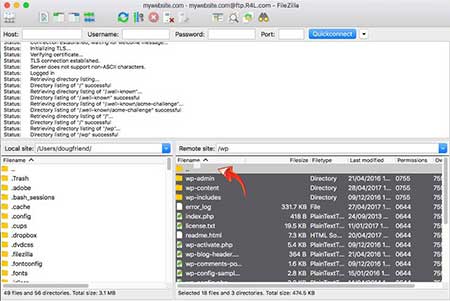
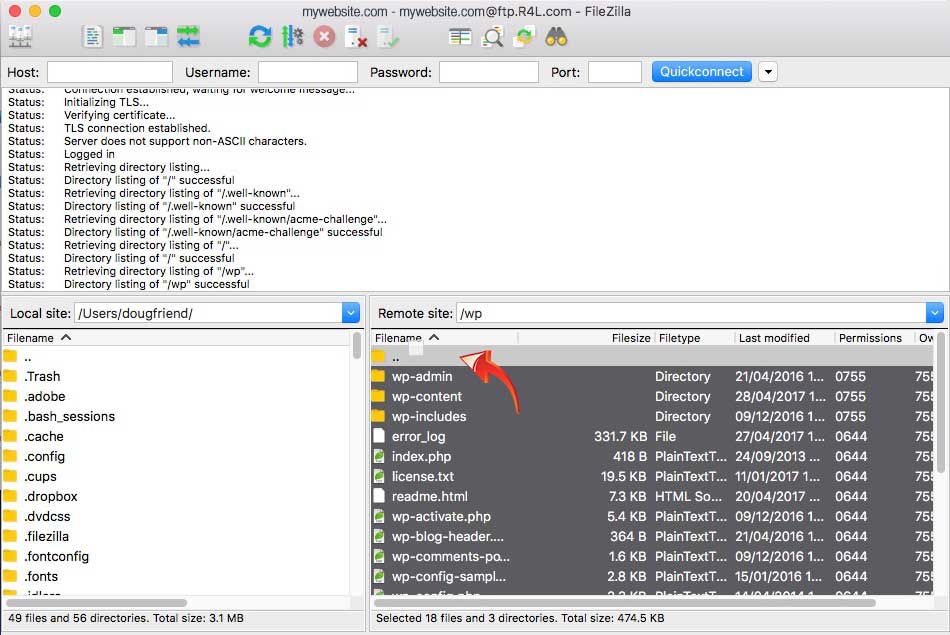
Using FTP
Connect to your site using your usual FTP program (FileZilla shown here). You should be connected with the /public_html directory as the current directory. In our example, your computer’s file system is in the window on the left, and the server’s on the right.
- On the server’s side, double click on the directory where the WordPress site is.
- Click the very top file, scroll to the very bottom, and shift-click to select all of the files.
- Drag and drop the files on the top icon which shows a yellow folder followed by two dots (..).
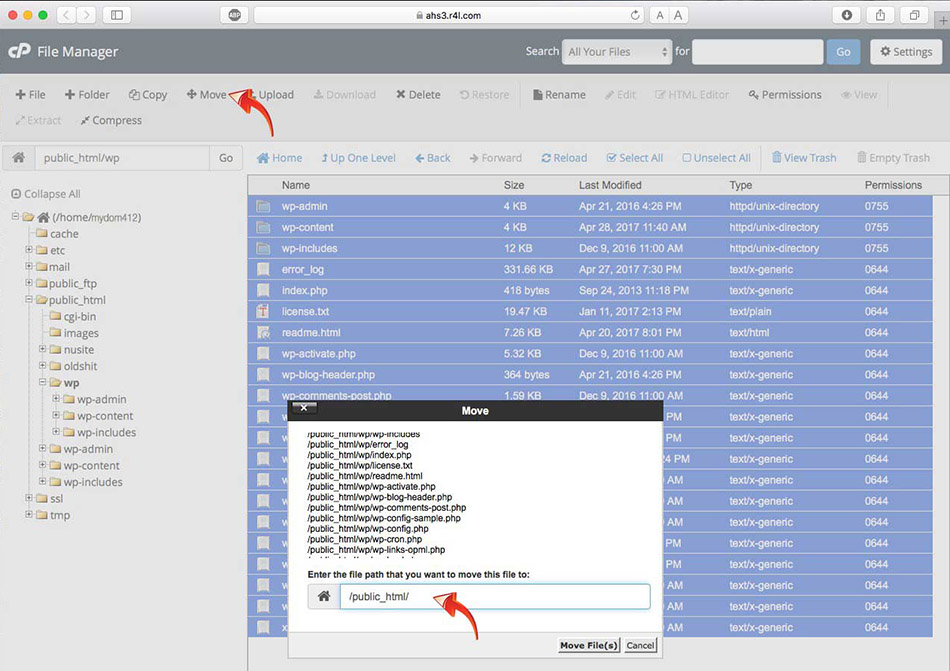
Using the cPanel’s File Manager
- Open up the cPanel for your domain, and click the File Manager icon in the FILES section of cPanel.
- On the left column, click the plus sign next to public_html. This will show you on the left column what directories are in the root public_html folder.
- Click on the directory name on the left column where WordPress is installed.
- Select the upper most directory on the right window, and shift-click the bottom most file so all files and directories are highlighted.
- Click Move on the top menu bar
- A window will pop up. Delete the directory name so only /public_html/ is displayed, and click the Move Files button.
5 – Update Permalinks
You now need to log in again to the WordPress dashboard. Enter in your domain name followed by /wp-admin. The final step in moving your site is to update the permalinks for your website. Log into your WordPress dashboard, and navigate to Settings > Permalinks. Click on Plain, and then the blue Save Changes button. Once this has been saved, your site will now be fully functional. It is highly recommended once you’ve completed this step, you update your permalinks again to “Post name” and click the Save Changes button again. This makes your URLs more readable, and better for indexing by search engines.

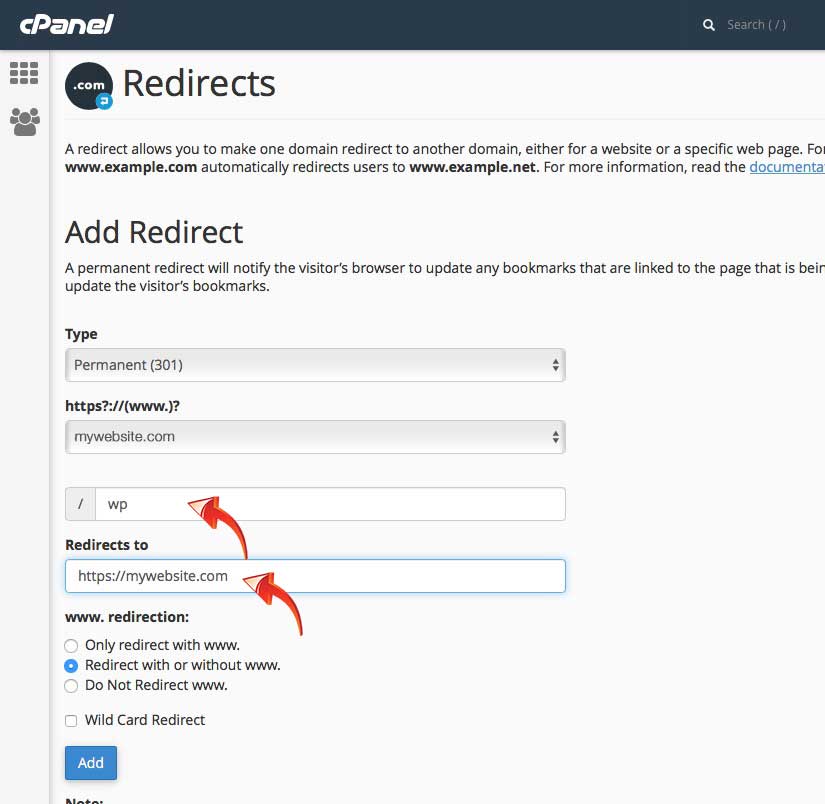
6 – Setup 301 Forwarding
If there are external links or your site has already been searched and ranked by search engines, you’ll want to setup forwarding with the 301 redirect (permanent redirection) so that you can preserver your existing search engine rankings. The redirection will also ensure anyone that’s linked to your old site’s location will still be able to find you.
- On the cPanel, click on Redirects in the Domains section
- Choose 301 option
- Enter in the directory where WordPress was installed
- Type in your domain name where WordPress has been moved to and click the blue Add button.
 New Softaculous Default Settings