The Evolution of Domain Names: A Timeline from the First Registration to Today’s Modern Extensions

March 21st, 2023

1985: The Birth of the Domain

The history of domain names began in 1985 when the first-ever domain name, symbolics.com, was registered by Symbolics Inc., a computer manufacturer.  This milestone marked the beginning of a new era for the internet, with domain names becoming a crucial aspect of an online presence.

The 90’s: The .com Boom and TLD Expansion

As the internet grew rapidly in the 90’s, domain names experienced a significant expansion.  The iconic Top-Level Domains (TLDs), such as .com, .org, and .net, emerged during this time and quickly gained popularity.  Businesses, individuals and organizations started registering .com domains at an unprecedented pace, recognizing their importance for branding and online visibility.

In 1998, the Internet Corporation for Assigned Names and Numbers (ICANN) was established to manage and oversee the domain name system.  This organization facilitated the introduction of new TLDs, including country code TLDs (ccTLDs) like .ca, .us, .uk, .de, and .au, as well as generic TLDs (gTLDs) such as .info and .biz.  ICANN is the body that oversees all accredited registrars like Register4Less, Inc.

2000’s: The Era of Domain Name Creativity

As the demand for domain names surged, the 2000’s witnessed the rise of creative domain hacks and unconventional TLDs.  Domain name investors and businesses sought unique, memorable names by combining different TLDs and using wordplay.  For example, domains like del.icio.us (Delicious) and bit.ly (Bitly) cleverly employed unconventional TLDs to form catchy brand names.

2010’s: The New gTLD Revolution

The 2010’s marked a significant turning point in the domain name landscape, as ICANN began implementing the New Generic Top-Level Domain (New gTLD) program.  This program allowed for the introduction of hundreds of new TLDs, including industry-specific extensions (.tech, .travel), location-based extensions (.nyc, .berlin), and brand-specific TLDs (.google, .amazon).  These new gTLDs provided businesses and individuals with more options to personalize and tailor their domain names to their specific needs.

2020’s and Beyond: The Modern Domain Name Landscape

Today, the domain name landscape is more diverse and flexible than ever before.  With over 1,500 TLDs available, businesses and individuals can find the perfect domain name to suit their brand, niche, or geographic location.  Additionally, innovative technologies such as Internationalized Domain Names (IDNs) allow for domain names in non-Latin scripts, further expanding the global reach and accessibility of the internet.

From the first domain registration in 1985 to the modern array of TLDs available today, the evolution of domain names reflects the rapid growth and innovation of the internet.   As we continue to embrace new technologies and platforms, the future of domain names promises to be just as dynamic and exciting as their past.

Resetting WordPress Password

July 24th, 2019

WordPress is the most popular Content Management System (CMS) on the Internet, making up 43% of all websites (up from 34% when this post was originally written in 2019).  WordPress stores all user data, including your admin username and password in a MySQL database.  For security reasons, WordPress stores passwords encrypted, making them not readable or directly writable.  You can’t just connect to the database and update the username and password in plain text.  You need to first use an online tool to encrypt new password.  Here are the steps to follow to reset your admin login:

  • Log in to manage your domain name, and go to the menu Profile > Manage Advanced Hosting to open the Plesk interface.  It will open in a new pop up window or tab.
  • On the Plesk interface, you should see Dashboard highlighted/underlined.  It it’s not, click it.
  • Click the link for Databases.
  • Click phpMyAdmin
  • You should see a list of “tables” in the left column.  They will all have a username prepended to each table name, followed by an underscore and the wordPress table name.
  • Look for the one that ends with _users and select that.
  • You will see two columns with user_login and user_pass.  The user_login will have your admin username.  The user_pass is what we’re going to be updating.
  • On a separate browser window, go to your favourite search engine and look up generate md5 hash.  This is the way to encrypt your new password.
  • On the site you choose, enter in your new password and have the site generate the md5 hash encrypted string.  It will be 32 characters long.
  • Select and copy (Control or Command C) the entire string.
  • Double click the current encrypted that is on the same line as your admin user_name.  That will select the entire string for the user_pass.
  • Paste (Control or Command V) in the new encrypted password and hit Enter.  You should see a pop-up message that says 1 row affected.
  • Close the phpMyAdmin window and go back to the login screen for your WordPress website.  You can now log in with your new password.

Broad Support for Let’s Encrypt SSL Digital Certificates

August 14th, 2018

With all of our paid hosting platforms, R4L provides you a free digital digital certificate called Let’s Encrypt.  The web is quickly moving towards requiring sites to use encryption.  When you order an paid hosting plan with R4L, the SSL cert is automatically installed and maintained for you, allowing your website and email to be fully encrypted.

As posted on the news last week on the website Slashdot, the Let’s Encrypt open source SSL Certificate is now recognized by all major root certificates, including:

  • Microsoft,
  • Google,
  • Apple,
  • Mozilla,
  • Oracle, and
  • Blackberry

Let’s encrypt has been trusted by almost all borwsers, it had done so thoruh an intermediate certificate from a vendor called IdenTrust.  With Let’s Encrypt now being directly recognized and trusted, there is no longer a third party involved.  If ever in the future there were a problem with IdenTrust (we’re not saying that’s likely), Let’s Encrypt would continue to be trusted without a problem.  A problem similar to this did happen to Symantec certs when they were untrusted by Google and Mozilla.

Let’s Encrypt is now directly trusted by all major browsers and operating systems.

Moving a WordPress Site to the Root Directory

June 1st, 2017

There are a couple of common reasons people will want to move their WordPress website from a directory to the root directory.  The most common we’ve seen are:

  1. They installed WordPress in Softaculous’ default /wp directory, and don’t want to have to setup a forwarder for their website.
  2. They developed their site in a directory so that their website would not be offline or interfered with and now want to replace their existing site with the WordPress site.

While you can use the Duplicator plugin to create a zip archive of your website and then restore it in the root, there really is no need to create a large file to download and then re-upload.  The advantage of this is the plugin will rename all of the URLs that will need to be updated.  Disadvantage however is it is much slower, and potentially creates a very large file you will need to download and then re-upload.

Here’s how to do the move without the plugin:

1 – Backup Your Site

Before doing the move, to be safe, we recommend you use the backup wizard to create a backup of your home directory and MySQL database.  The backup Wizard will download the two backup files to your local hard drive.

  • Log in for your domain and open your cPanel
  • Click on Backup Wizard in the Files section
  • Click Backup, and then Home Directory and MySql Database

2 – Remove Old Files from the Root Directory

You can do this in a number of ways, deleting the files or moving them to a directory called something like “old_site”.

  • It is important that you delete or move the file called index.htm or index.html.  WordPress uses a file named index.php as its starting index file.  Most web servers, including ours, will load the html file before the php file.
  • Make certain there are no files in the root directory that would have the same name as any files that are in the directory where your WordPress website is currently.
  • If your WordPress site is currently using a caching plugin, deactivate the plugin and remove any cached files.

3 – Update WordPress’ Target Address

Log into your WordPress dashboard, and go to Settings > General, and update the target WordPress Address and Site Address so that the directory is removed.

When you click the Save button, you will immediately see a 404 Not Found error page.  Do not ba alarmed, that is normal.  You will be able to log in once you move your files in the next step.

4 – Move the Files

Using either FTP or the File Manager, you’re going to move the files from the directory WordPress is in to the root directory for your website.

Using FTP

Connect to your site using your usual FTP program (FileZilla shown here).  You should be connected with the /public_html directory as the current directory.  In our example, your computer’s file system is in the window on the left, and the server’s on the right.

  • On the server’s side, double click on the directory where the WordPress site is.
  • Click the very top file, scroll to the very bottom, and shift-click to select all of the files.
  • Drag and drop the files on the top icon which shows a yellow folder followed by two dots (..).

Using the cPanel’s File Manager

  • Open up the cPanel for your domain, and click the File Manager icon in the FILES section of cPanel.
  • On the left column, click the plus sign next to public_html.  This will show you on the left column what directories are in the root public_html folder.
  • Click on the directory name on the left column where WordPress is installed.
  • Select the upper most directory on the right window, and shift-click the bottom most file so all files and directories are highlighted.
  • Click Move on the top menu bar
  • A window will pop up.  Delete the directory name so only /public_html/ is displayed, and click the Move Files button.

5 – Update Permalinks

You now need to log in again to the WordPress dashboard.  Enter in your domain name followed by /wp-admin.  The final step in moving your site is to update the permalinks for your website.  Log into your WordPress dashboard, and navigate to Settings > Permalinks.  Click on Plain, and then the blue Save Changes button.  Once this has been saved, your site will now be fully functional.  It is highly recommended once you’ve completed this step, you update your permalinks again to “Post name” and click the Save Changes button again.  This makes your URLs more readable, and better for indexing by search engines.

6 – Setup 301 Forwarding

If there are external links or your site has already been searched and ranked by search engines, you’ll want to setup forwarding with the 301 redirect (permanent redirection) so that you can preserver your existing search engine rankings.  The redirection will also ensure anyone that’s linked to your old site’s location will still be able to find you.

  • On the cPanel, click on Redirects in the Domains section
  • Choose 301 option
  • Enter in the directory where WordPress was installed
  • Type in your domain name where WordPress has been moved to and click the blue Add button.

HTTPS with Advanced Hosting

May 19th, 2017

You may have read that Register4Less.com has added to our paid hosting plans Let’s Encrypt, a free open-source SSL certificate.  This certificate is now installed automatically when you order an advanced hosting plan, and has been installed for all existing paid hosting plans.

Benefits of having your site visitors connect using the https encrypted protocol include:

  • Better Search Engine ranking
  • Enhanced User Trust
  • Protect your User’s sensitive information

Forcing an https:// Connection

When people visit your website, but default if they type in your domain without specifying https://, they will connect with a standard unencrypted http:// connection.  Older links to your website may also not specify the secure protocol, so these would also provide un-encrypted connection.

You can however quite easily switch an http to an https connection by editing your .htaccess file.  Here’s how to do this.

  1. Log in for your domain, and go to Paid Hosting > Manage Advanced Hosting to open up the cPanel window
  2. In the Files section, click on the icon for File Manager.  This will open in a new window
  3. On the upper right click on Settings.  If the option for Show Hidden Files (dotfiles) is not checked, check it and save.
  4. On the left column, click on the public_html folder.
  5. Look for a file named .htaccess in your public_html folder.  If there isn’t one, go to File and create a new file named .htaccess in the /pubic_html folder.
  6. Select the file, and click Edit
  7. Paste the following two lines into the file, and click the Save Changes button.
          RewriteCond %{HTTPS} off
          RewriteRule ^ https://%{HTTP_HOST}%{REQUEST_URI} [R=301,L]

PHP 7.1 Now Available

April 6th, 2017

Php 7.1If you are one of our customers that uses our Advanced Hosting Platform, you’ll be pleased to know Register4Less has now added PHP version 7.1.   PHP is one of the most popular programming languages used on the web today.  Sites like Facebook, WordPress, Twitter and Wikipedia all run using PHP.

The cPanel default (and native) version of PHP is 5.6.  Switching to version 7.1 should make your website load more quickly, thanks to the optimizations that have been made in 7.1.

To make the switch for your website, do the following:

  • Log in on http://register4less.com for your domain that’s using the advanced hosting.
  • Open up the cPanel (Paid Hosting > Manage Advanced Hosting)
  • In the Software section, look for “Select PHP Version” and click the link or icon.
  • You may want to note the current version you are using in case you need to revert if your website has problems with PHP 7.1.  It’s probably 5.6 though.
  • From the drop down menu, select 7.1 and click the Set as Current button.
  • Click on “Use Defaults” at the bottom of the page to use defaults PHP modules.

You’ll want to test your site to make sure everything is functioning correctly.  For WordPress sites, some plugins are not yet compatible with PHPp 7.1, so you may want to try 7.0 if things are not working correctly, or revert back to the version you took note of earlier.

Upgrade of Basic Hosting Server to NGINX

March 28th, 2017

NGINX is an open-source, high-performance HTTP server and reverse proxy, as well as an IMAP/POP3 proxy server. NGINX is known for its high performance, stability, rich feature set, simple configuration, and low resource consumption.

This past week, out network staff have upgraded the hosting platform for the 10MB free hosting service Register4Less.com provides with every domain name.  The server for the http://Register4Less.com website itself has also been upgraded to NGINX.  The hosting platform had been using Lighttpd for a number of years before the upgrade.

NGINX provides a number of advantages over Lighttpd or Apache, including:

  • possible per-domain customizations if required,
  • sub-domains can now be setup by ftping using the same credential as the domain it’s based on, using its own top-level folder,
  • no database use for configuration, so even more responsive than before,
  • using latest stable Nginx web server for better security.

While our staff are confident that the change from Lighttpd to NGINX will be seamless, we ask that if you are using our basic hosting platform and see any issues to contact our support team.

In the industry today, NGINX is second only to Apache in terms of volume of sites that use it as the web server application.

.EU – Changes to the Renewal Grace Period

November 17th, 2016

Effective November 23, 2016, all .EU domain names will no longer have a Renewal Grace Period.

Any .EU domain expiring on or after November 23, 2016 will be deleted immediately, if not renewed before that date.  .EU domains still retain the Redemption period, so any domain that has been deleted will be subject to a redemption fee plus the domain’s normal renewal fee if needed to be renewed.

We at Register4Less.com of course would prefer to avoid this additional fee on the domain’s renewal, so it is imperative to not allow .eu domains to expire unless you fully intend to drop the domain.

If you have questions regarding this, please don’t hesitate to contact our support team.

New Rules for Changing Domain Ownership

October 4th, 2016

ownership
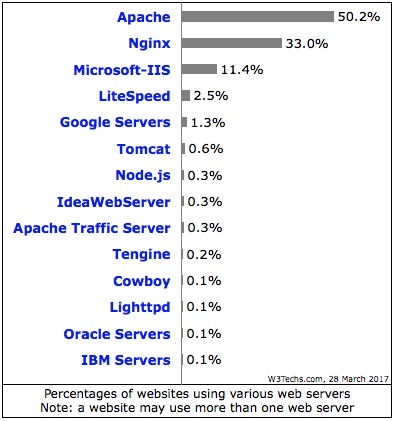
On December 1st, 2016, ICANN will require all accredited registrars significantly change how they handle domain ownership changes.  Briefly, it will no longer be possible to update the domain owner’s contact information by simply logging in to manage the domain and submit a new set of contact data.

Inter-Registrar Transfers

Currently, the only type of transfer of a domain that requires confirmation is the Inter Registrar transfer which is governed by ICANN’s Inter Registrar Transfer Policy.  The process of transferring a domain from one registrar to another will still follow the confirmation process with the domain’s current administrative contact.  The current contact must click a link sent to the contact in the current Whois record for the domain being transferred.  The admin contact must confirm the transfer with the current registrar, and may confirm the transfer away from the current registrar.

Inter-Registrant Transfers

New starting in December will be the process of confirming changes in the owner contact of a domain.  When there is a change in the owner contact’s first or last name, organization name, email or telephone number, a new confirmation process will be triggered.  The process is as follows:

  • Register4Less (R4L) will first check if the domain name is eligible for a change in the owner’s contact.  If the domain is not, the contact update will not be saved and a message presented to the user stating why the domain cannot be updated at this time.
  • R4L will send an email to the current owner contact requesting they (or their designated agent) approve the change.  If that email is not responded to favourably, the contact change is rejected.
  • Once confirmed by the current owner contact, R4L will send an email to  the new owner contact requesting they (or again, their designated agent) approve the change.  Note, the previous and new owner contact may be the same address.  Both emails need to be confirmed in order for the update to complete.
  • If / when both confirmations are positive, R4L will then send an email to both contacts confirming the update.

The R4L Team will post updates to this procedure as they develop.

Use Your Gmail Account to Filter Spam

July 7th, 2016

Less Spam with GreylistingI have had a gmail account setup for a number of years, but really haven’t been getting much use out it since I prefer to use my personal email based on my own domain name, which is of course registered and hosted with register4less.com.  The one thing gmail does actually do quite well is filter spam with a low rate of filtering out valid email.  There are a number of reasons I recommend to use an email address based on your own domain, including branding, portability, tie-in with your website, but that’s not the focus of this post.

Gmail allows you to forward incoming messages to your gmail address to any other external address, and this is what allows you to flow your email to gmail and back to your domain based email address for filtering.  Here are the steps:

Setup on Gmail:

  • If you don’t have a gmail account, go to their website and create a free account
  • Log into your gmail account, and go to Settings page, and then to the Forwarding and Pop tab.
  • In the Forwarding option, set gmail to forward all email to your domain based email address, and keep a copy in inbox on your gmail account.

Setup on R4L:

In this example, I will use the example email address johndoe@gmail.com and john@doe.com (both not real addresses, so please don’t email them).  My apologies if Mr. Doe receives additional email as a result of this post 🙂

  • Log into your account on Register4Less.com and go to the cPanel (Paid Hosting > Manage Advanced Hosting) where you normally manage your email accounts.
  • Click on Email Filters, and then your email address (john@doe.com in this example)
  • Click the blue Create Filter button
  • Give the filter a name (gmail filtering)
  • Under rules, choose Any Header and does not contain
  • In the box below, enter in the text X-Forwarded For: followed by your gmail address and then your domain based address.   In our example, that would be  X-Forwarded For: johndoe@gmail.com john@doe.com .
  • Under Actions, choose Redirect to Email, and in the text box below enter in your gmail address.  Again in our example, you would enter in johndoe@gmail.com .
  • Click the blue Save button

That is the entire setup.  Your email will now forward to gmail (spam included), be filtered, and then forwarded back.  The filter in your R4L account checks to see if the email was forwarded from your gmail account, and only if it finds that the email did not come from there will it forward to gmail.

You may know that Register4Less.com automatically backs up all of our hosting accounts on a daily basis for one week, and on a weekly basis for four weeks.  Setting up this forward will also create an additional backup for you, as all of the email that is forwarded to your gmail account will stay in the inbox there as well.

Please give this a try and let us know how it works for you.

Site Publisher

May 6th, 2016

SitePublisherA new feature has been added to our paid hosting platform that allows you to create a simple website with no HTML coding needed.  Three different styles of web pages are supported.  To access this new feature, connect to your cPanel by going to the menu for Paid Hosting, and then click on Manage Advanced Hosting.

Personalized Parking Page

A domain registered with Register4Less.com will have a parking page generated by us if nothing else is setup for the domain.  If you prefer to setup your own parking page, choose the Under Contruction template.  You’ll enter in a title, description, your email address and Google Analytics tracker ID (optional).

Personal Website

With the personal website, you will enter in more contact information (name, tag line, avatar image URL), along with contact information, an about me description, links to social media (Facebook, Twitter, LinkedIn) and the Google ID.

Business Website

The business website adds more options for your site, including a description header, business description, business hours and hour notes, social media links and a google maps URL to help customers find your business.

Publish and your site is live

With all of these options, once you click Publish, your web page will instantly go live.  All of your content can be edited at any time.

Change Where Your Site’s Hosted (without changing where it’s hosted!)

April 14th, 2016

The Domain Name System (DNS)

When you type in the name of a website, there’s a lot that happens in the background that will connect your web browser with the server the site is on, and what does that is DNS.  Every website, every service, practically every device connected to the Internet has a unique address that tells every other device where to connect to it.  That numeric address an IP address like this one: 192.99.3.191 (IP version 4) or 0:0:0:0:0:ffff:c063:3bf (IP version 6).  Problem is, numeric addresses are not easy to remember, so the DNS system translates web addresses like www.register4less.com that you and I are familiar with into the IP address where that website is hosted.

The Hosts File

This week, we’ll cover how you can override the actual IP address a website is on for Mac and Linux computers.  Next week, we’ll cover how to do this on a Windows computer.

On your Mac or Linux computer, there is a hosts file that contains a listing of IP addresses and domain names.  Your computer will look to the hosts file prior to going outside to your ISP for cached (saved) DNS or to the DNS server for the domain, so if you have an entry for a domain in your hosts file, it will supersede the domain’s actual DNS.

There are a number of reasons why you would want to have an entry to override a domain’s actual DNS information.  If you’re testing a new environment as discussed above, this is a very quick and easy way to get your domain to resolve to a new host without complications.  You can also use the hosts file to “blackhole” sites that you do not want accessible like spyware sites, ad networks, pornographic sites, etc.  For those sites, you would specify the IP address as 127.0.0.1.

How to Edit Your Hosts File (Windows)

In Microsoft operating systems, most versions will have the HOSTS file is located in the following location:

C:\Windows\System32\Drivers\etc

As with Mac and Linux, the hosts file on Windows is a text file.  To edit the file, open the File Manager, navigate to this directory.  Locate the file, right-click on it, and choose to open the file with Notepad. You will see a file similar to this in Notepad:

# Copyright (c) 1993-2009 Microsoft Corp.
#
# This is a sample HOSTS file used by Microsoft TCP/IP for Windows
#
# This file contains the mappings of IP addresses to host names. Each
# entry should be kept on an individual line. The IP address should
# be placed in the first column followed by the corresponding host name.
# The IP address and the host name should be separated by at least one
# space.
#
# Additionally, comments (such as these) may be inserted on individual
# lines or following the machine name denoted by a '#' symbol.
#
# For example:
#
#      102.54.94.97     rhino.acme.com          # source server
#       38.25.63.10     x.acme.com              # x client host
# localhost name resolution is handle within DNS itself.
#       127.0.0.1       localhost
#       ::1             localhost

Enter in the the IP address of the new server, along with the domain name and www. plus the domain name.

# Override the actual IP address where the domain's DNS resolves
198.27.68.184 lakesideninos.org www.lakesideninos.org

Write the file and exit Notepad.

How to Edit Your Hosts File (Mac)

The hosts file is a text file that is in a directory that you would not normally access, /etc.  The best way to edit and save the hosts file is to use a text editor on your computer’s console/terminal.  One your mac (if you’re a Linux user, we are assuming you know already how to access the console and use the vi editor), do the following:

  1. Open Finder and click on Applications
  2. Double click the Utilities folder
  3. Double click on Terminal
  4. type sudo vi /etc/hosts and hit the enter key
  5. You will be prompted to enter in your account password for your computer.  Type that in and hit enter.

You will see a file that looks something like this:

# 
# Host Database 
#           
# localhost is used to configure the loopback interface
# when the system is booting.  Do not change this entry.
# 
127.0.0.1       localhost

In our example we are going to use the domain name lakesideninos.org and the IP address 198.27.68.184, the IP address for our ahs2.R4L.com server.

Adding an entry to your hosts file

  1. Hold Shift and G down together to place the cursor at the bottom of the file.
  2. Type o to go to insert mode on the next line
  3. Type in the IP address followed by a space, then the name of the website, and then the name of the site again with www. in front of it and hit enter. In our example, I would type in the following:
# Override the actual IP address where the domain's DNS resolves
198.27.68.184 lakesideninos.org www.lakesideninos.org

# Block out unwanted websites
127.0.0.1 badsitename.com www.badsitename.com
  1. Hit the Esc key to exit insert mode.
  2. Type :wq and hit enter to save and exit the editor.
  3. type exit and hit enter to close Terminal.

Undoing the Change

Once you’ve tested the site and want the real DNS to apply, you will want to make the changes for the domain to point to the new host (assuming that’s why you are overriding the real DNS resolution), you will want to delete the entries from the hosts file.

  1. Follow the instructions above to open the terminal and edit the file with vi.
  2. Use the arrow keys to move the cursor to the first line where the domain and its IP address appear.
  3. Hit the d key twice to delete the line.
  4. Do the same with the entry for www. plus the domain.
  5. Type in :wq to write the hosts file and quit the editor.
  6. Hold Control d to close Terminal.